In today’s tutorial, we will be learning how to sight in a crossbow. Once you have properly learnt how to shoot an arrow, the next step is to learn sighting in a crossbow. Crossbow sighting, as you know holds primary significance in aiming the target precisely.
The procedure for crossbow sighting may vary a little from scope to scope but the major steps stay almost the same. Read on to learn all about them.
What are Dots and Reticles?
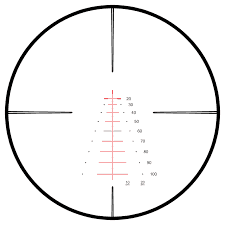
The crosses and dots that you see when you look through a crossbow scope are called dots and reticles. All crossbow scopes have two categories: Optical (reticle) scopes and red dot (dots).
The dots are further divided into:
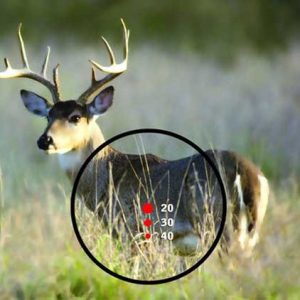
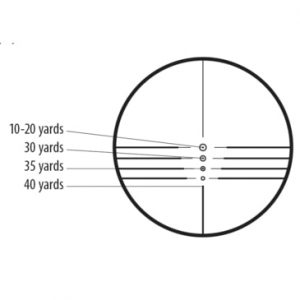
- A single red dot which usually represents 20 yards. You need to hold the dot a little higher when you want to shoot at a longer distance from the crossbow.
- Triple red dots which represent 30 and 40 yards from the crossbow. Such scopes are perfect for movement, wind and elevation.
Reticles have the following categories:
1-Basic reticle
These have a 20-yard spot. They have crosshairs which show that you must take a longer shot if it is moved in the upwards direction.
2-Duplex
This is also known as a multi-reticle, triplex scope and multi-X. These scopes assist you with your aim using their tiny dots which are located at the intersection of the crosshairs. Both vertical and horizontal crosshairs are available.
3-Focal plane
These are also known as mil-based reticles. They work well as tactical scopes and work both as first place reticles and second place reticles for crossbows.
4-BDC reticles
These are Bullet drop compensating reticles which help increase accuracy by compensating for external factors.
What is an elevation and windage adjuster?
All scopes have two different kinds of knobs which help in sighting the crossbow accurately.
Windage adjustment knob
This knob is located on the scope’s side. It helps you the arrow’s point-of-impact both right and left.
Elevation adjustment knob
This knob is located on the top of the scope. It helps in adjusting the arrow’s point-of-impact in the up and down direction.
You will notice that both these knobs have plastic caps on top of them for protection. You have to remove these in order to adjust the knobs. After removing the plastic caps, you will be able to see that the knobs have markings on them which indicate the direction in which you should turn them for crossbow scope adjustment.
Turning the elevation adjustment knob clockwise raises the arrow’s point-of-impact and rotating it counter-clockwise allows you to lower it. Similarly, turning the windage adjustment knobs in the clockwise direction moves the arrow’s point-of-impact towards the right while turning it counter-clockwise moves it towards the left direction.
The knobs are quite small so you will not be able to turn them with your fingers. You will have to take the help of either a coin or a screwdriver. Therefore, it is absolutely necessary that you have these tools with you while shooting. Once you have adjusted the knobs, make sure that you cover the knobs with the plastic caps again.
Measuring the clicks
The adjustments from the knobs are measured using clicks. The unit of adjustment of the clicks is Minutes of Angle or M.O.A. The relationship between the clicks and distance is as follows:
One-click = quarter-inch adjustment measures at 100 yards
Similarly,
One-click = 1/20-inch measured at 20 yards
This is standard for most crossbow scopes. However, you should check the user manual of the crossbow to make sure that this is not different for your particular crossbow.
How to sight in a crossbow scope
Having provided you with a detail of all the parts of a crossbow scope, we will now move on to the main question on your mind: How to sight in a crossbow? While learning how to sight in a crossbow, it is recommended that you use a shooting aid that will help keep the crossbow fixed in place even when you pull the trigger. Using a shooting aid will help you sight the crossbow most accurately.
You can get a shooting aid from the shooting range you go to and if not, don’t worry because it is not a necessary tool and you can still shoot well without it. Following are all the steps that you need to follow in order to sight your crossbow.
Prepare Your Crossbow
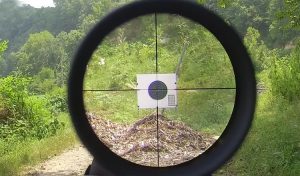
1. Firstly, you need to stand exactly twenty yards away from the target. After that prepare your crossbow for use by cocking it using a crank aid or a rope. Now, seat an arrow in the crossbow. Once the arrow is in the crossbow, align the red dot on top of your scope’s lens with the bull’s eye of the target.

After shooting the three arrows, go look at the target closely. You will notice that even though the arrows have landed close together, they might not have landed exactly on the bull’s eye on your first try. Now, we will make adjustments to remove this error.
Look to The Target Closely
2. Look at the target closely and try to get an estimate of how many inches you need to move your focus in the up-down and right-left direction in order to hit the bull’s eye. Let’s assume that you need to shoot the arrows 1 inch to the right and 2 inches higher.

To do this, you need to make adjustments to the elevation and windage knobs. Remove their plastic caps and use a coin or screw driver to move them. In order to move the arrow’s point-of-impact 1 inch to the right you need to keep turning the windage adjustment knob until you hear 20 clicks in total. This is because each click corresponds to one by twentieth of an inch.
To move the arrow’s point-of-impact 2 inches upwards you need to keep turning the windage adjustment knob until you hear 40 clicks in total. These adjustments will help you shoot the arrow exactly on the bull’s eye.
Adjust Knobs Accordingly

3. Now that you have adjusted the knobs accordingly, you can hope that the arrows will land on the bull’s eye. Prepare your crossbow again. Cock it, put in the bolt and align the top red dot with your target’s bull’s eye. Make sure you are standing at a 20-yard distance away from the target
Again, fire three arrows in total. Once you are done firing, unload the crossbow and go check the target again up close. Check if any adjustments are needed and if you still need adjustments, adjust the knobs again and fire to check for accuracy.
You can stop repeating this whole process once you start achieving a perfect bull’s eye. Once you do, you can enjoy firing for as long as you want.
Key Points to Consider Before Sighting Crossbow
Just because you got the bull’s eye one time does not mean that you are a pro now and you don’t need any more help. Practice and practice again to get better and better at firing arrows.
Keep the following things in mind if you want to ensure a good sighting.
- 1. Sighting a crossbow takes a lot of patience and multiple tries so if you are doing it for the first time, keep in mind that it will take a long time. You will have to adjust the knobs multiple times in order to fire a perfect bull’s eye. Use assistance tools such as a firing aid to make the whole process easier for you. Such tools will not only make the sighting process easier but will also save you lots of time.
- 2. Take care of the plastic caps of the knobs because they help keep the knobs safe and intact. Make sure you put them in a safe place as soon as you take them off and put them back on when you are done adjusting the knobs.
- 3. If you are using a scope with only one reticle, you can easily sight it for your preferred distance, be it 20, 30 or even 80 yards. However, if your scope has multiple reticles then you will have to use them according to the specified distances. For a multi-dot scope, sight the top reticle at exactly 20 yards unless the user manual states otherwise.
- 4. Before learning how to shoot at the bull’s eye, you must learn how to shoot arrows in tight groups, which means shooting arrows really close by. You cannot sight your crossbow until you have a hold on firing arrows in tight groups. If your arrows are landing in a scattered pattern then you need to work on your technique and aim. Practice a lot until you become perfect.
Remember – Practice Makes You Perfect
If you followed all the steps mentioned above properly then we hope that you must have landed your first bull’s eye. If not, then there’s no need to worry because there is always tomorrow to start again and push yourself to the edge.
Some shooters might learn how to shoot a bull’s eye very quickly whereas others might take days or even weeks to do it. Everyone is different, therefore, just because your partner landed his or her bull’s eye faster than you does not mean you are less capable.
Just practice a lot and soon you will be able to land a bull’s eye like it is no big thing. Focus on all the tips that we have given you including using a firing aid. Once you learn how to sight a crossbow from 20 yards, repeat the whole process for a 40 yards distance. Challenge yourself as much as possible to maintain your interest.
We hope that our tutorial on how to sight in a crossbow proved helpful to you and helped you learn all the ways that you can easily sight your crossbow. Shooting with crossbows is a challenging sport and it is also quite thrilling. However, it is also extremely important to make sure that you stay safe and do not injure yourself and anyone around you. Always follow all safety protocols when you are in the shooting range or out in the field. If you have any more questions, we would love to answer them. Just reach out to us and together we will solve any confusion or query that you might have. With that, we wish you the best of luck for your shooting expedition and we really hope that you land a perfect bull’s eye! Have fun but remember to stay safe!
