



As an Amazon Associate, we earn from qualifying purchases. Product links in this guide are affiliate links.
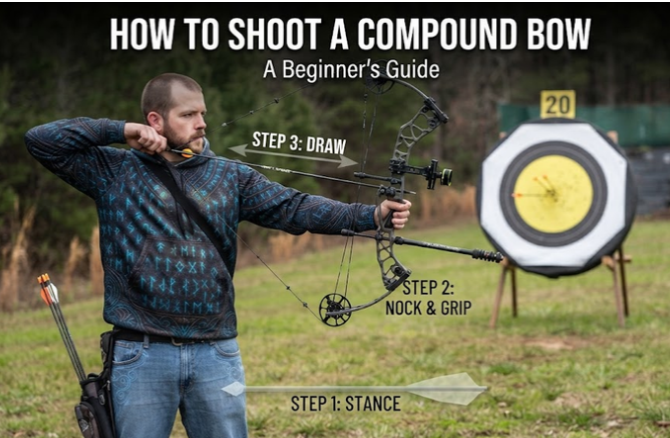
To learn how to shoot a compound bow, build one repeatable shot: stand square, nock, hook your release, draw with your back, anchor at the same spot, aim through the peep, and let the release surprise you. This guide walks you through each step, then shows you how to read your misses and practice without building bad habits.
What do you need before your first shot?
You need a bow that fits you, a release aid, arrows matched to the bow, and a safe backstop. When people struggle with how to shoot a compound bow, most problems that look like bad form are really fit problems. Sort out these three things before you touch the string.
Find your dominant eye
Your dominant eye decides which hand draws the string. Extend both arms, make a small triangle with your hands, and frame a distant object through it with both eyes open. Close your left eye. If the object stays in the triangle, you’re right-eye dominant and should shoot a right-handed bow (held in your left hand, drawn with your right).
If the object jumps out of frame, you’re left-eye dominant. Cross-dominant shooters, right-handed but left-eye dominant, usually do better learning on a bow that matches the eye. It feels awkward for a week. Fighting your eye feels awkward forever.
Check that the draw weight isn’t too heavy
A compound bow is a bow that uses cams and cables to reduce the holding weight at full draw, which is why you can aim steadily at a weight you couldn’t hold on a recurve. The catch is getting there. Nock On Archery recommends starting with a lower draw weight so your form develops first, and that holds for adults learning how to shoot a compound bow too.
Use a simple test. Point the bow at the target, keep it level, and draw straight back. If you have to aim the bow at the sky, hunch your shoulders, or shake to get it back, the weight is too high. Turn it down before your first real shot.
Three safety rules that aren’t optional
- Never dry fire. Pelican’s guide puts this at the top of its list, and for good reason. Releasing the string without an arrow sends all the stored energy into the bow itself.
- Nock an arrow only when you’re facing the target and the range is clear.
- Draw only toward something you’d be fine hitting. Never draw toward the sky or a person, even as a joke.
How to shoot a compound bow in 9 steps
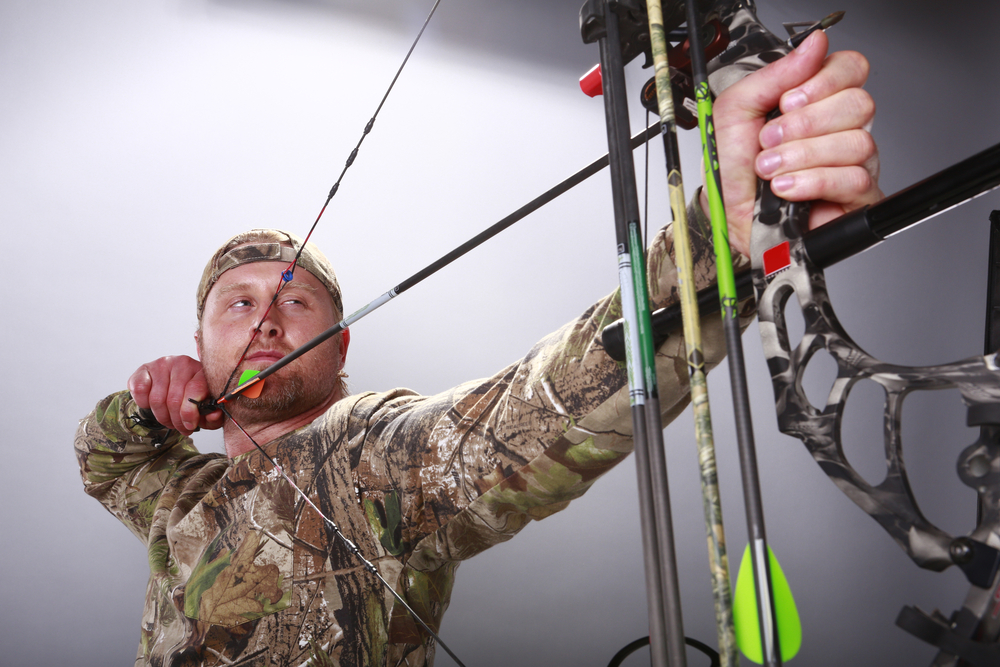
Good compound bow shooting form is a sequence, not a pose. Each step sets up the next, so rushing one shows up two steps later as a miss. Work through them in order until the order runs on its own. That repeatable sequence is really all that learning how to shoot a compound bow comes down to.
1. Set your stance
Stand perpendicular to the target with your feet about shoulder-width apart and your weight even between them. What matters is standing the same way every time. 3D champion Levi Morgan, interviewed by Field & Stream, suggests having someone trace your feet on a piece of cardboard and standing in those outlines each practice until the stance is automatic.
2. Nock the arrow
Set the arrow on the rest and snap the nock onto the string below the nock point or into the D-loop. The odd-colored fletching (the cock vane) usually points straight up on a drop-away rest; follow your rest’s instructions if it differs. You should hear a light click. A nock that falls off with a gentle shake isn’t seated.
3. Attach the release aid
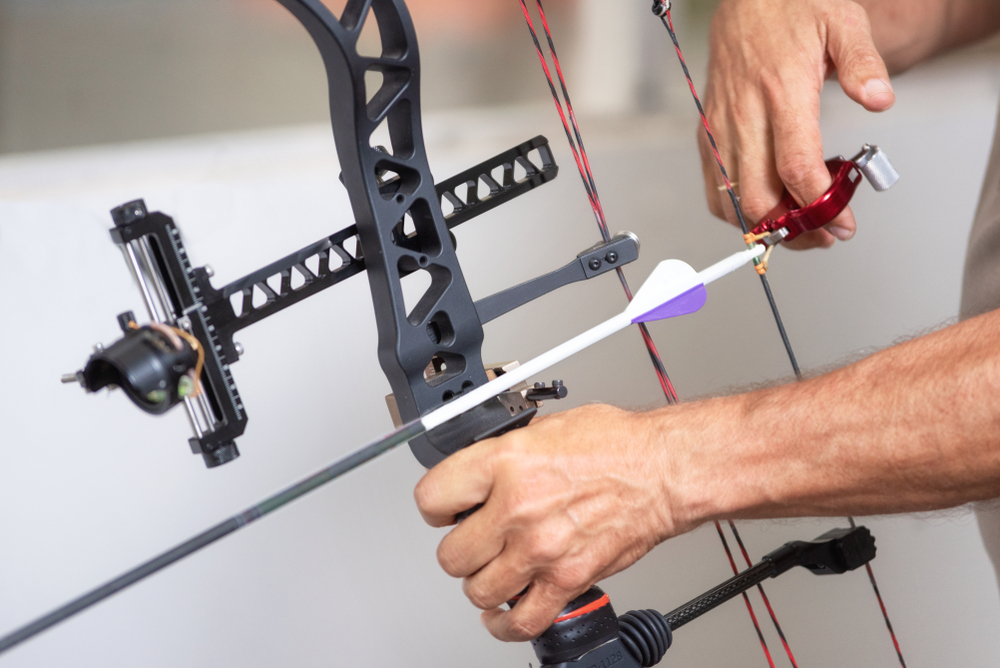
A compound bow release aid is a handheld trigger device that clips to the string’s D-loop and lets it go more cleanly than fingers can. Beginners usually see three types:
- Index-finger (wrist-strap) release: buckles to your wrist and fires with your index finger. It’s the most common choice for new shooters and bowhunters.
- Thumb-button (handheld) release: fires with your thumb and encourages a relaxed hand and back-tension shot.
- Hinge (back-tension) release: has no trigger and fires as you rotate it. Save this one for later; it’s a training tool, not a first release.
Clip on with your finger behind the trigger, not on it. That habit prevents most accidental releases while drawing.
Set the release length so the trigger meets your index finger at or just inside the first joint, not the fingertip. Bowhunting writer Bill Winke explains that the fingertip is so sensitive you feel the trigger move and start anticipating the shot. Most index releases have an adjustable stem for exactly this.
4. Set a relaxed grip
Let the grip rest on the bony heel of your palm, between the two fleshy pads, favoring the thumb side slightly. That’s how Levi Morgan describes it to Field & Stream. Let your fingers relax and curl lightly around the riser, with your knuckles at roughly 45 degrees.
Squeezing the grip twists the bow at the shot, and that twist is called torque. A wrist sling lets you keep the hand open without worrying about dropping the bow.
5. How to draw a compound bow
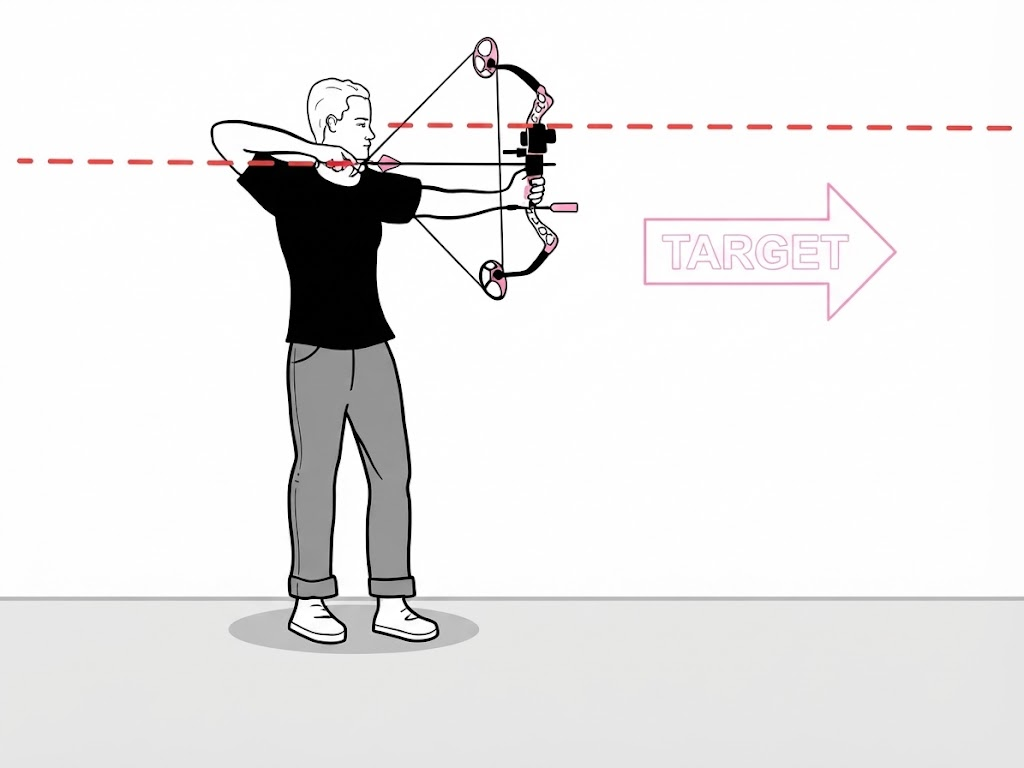
Raise the bow with your bow arm straight but not locked; Bill Winke recommends a slight bend so the arm stays relaxed. Rotate the elbow slightly down and out so the string clears your forearm. Draw straight back in one smooth motion, pulling with the muscles between your shoulder blades rather than your biceps. You’ll feel the weight peak, then drop sharply as the cams roll over into the “valley.”
Keep pulling gently against the draw stop. If you relax at full draw, the string can creep forward into the valley and jump.
6. Lock in your compound bow anchor point
Your compound bow anchor point is the exact spot where your release hand settles against your face at full draw. For most archers, the knuckles of the release hand tuck behind the jawbone, just below the ear.
Use at least two reference points that you can feel: the hand on the jaw plus the string touching the tip of your nose or the corner of your mouth. Two references make it hard to drift without noticing. Levi Morgan adds a third that many archers overlook: holding the release the same way on every shot. The anchor is also why the peep lines up, so a sloppy anchor shows up as a blurry, off-center peep.
7. How to aim a compound bow with a peep and pins
You aim a compound bow by looking through the peep, centering the sight housing in it, and holding the correct pin on the spot you want to hit.
How to use a peep sight
The peep is a small ring tied into the string. At a solid anchor, it should come to your eye without tilting your head. Center the round sight housing inside the peep ring like a circle inside a circle. If you have to bend your neck to find it, the peep height needs adjusting, which a pro shop can do in minutes.
Settle the pin, don’t freeze it
Put the pin on the spot and let it float. No one holds a pin perfectly still, and trying to stop the wobble is what causes the jerk. A pin that drifts calmly around the center produces tighter groups than a pin you’re fighting.
Level the bubble if your sight has one. A canted bow throws arrows left or right, and the effect grows with distance.
8. Squeeze a surprise release
With the pin floating, keep steady tension on the back of the shot. IBO 3D world champion Tim Gillingham, quoted by Field & Stream, puts that at roughly 30 percent push and 70 percent pull. With an index release, slowly squeeze the trigger while you hold that tension, so the shot fires on its own.
The goal is a surprise release. If you know exactly when the arrow will go, your body knows too and braces for it.
9. Follow through
Hold your position until the arrow hits the target. Your bow hand should let the bow tip forward into the wrist sling, and your release hand usually slides back along your jaw. Keep looking at the spot through the peep.
Dropping the bow arm to watch the arrow fly is the most common beginner miss. The arrow is still on the string for a split second after the release fires.
Should beginners punch the trigger?
Punching the trigger, also called command-style shooting, means firing deliberately the moment the pin crosses the center. It’s a real method, not just a bad habit. Tim Gillingham has won multiple IBO 3D world titles shooting it, and Field & Stream’s Dave Hurteau settled on it for hunting after finding that a surprise release brought on target panic for him.
We still suggest that anyone learning how to shoot a compound bow start with a surprise squeeze. Target panic is a flinch reflex where you can’t hold the pin on the spot or you fire before you mean to.
A deliberate command shot depends on already having a calm, floating pin; without that, most new shooters end up slapping at the pin as it passes, which is how the flinch starts. Build the float first. If a surprise release later makes you anxious, switching to command-style is a legitimate choice, not a failure.
Where are your arrows hitting?
Knowing how to shoot a compound bow includes knowing how to read a miss, and your grouping tells you what went wrong. Shoot three arrows at the same spot, then check where the group lands, not where one stray arrow went. The table assumes a right-handed archer; left-handed shooters should swap left and right.
| Group lands | Common cause | What to try |
|---|---|---|
| Left | Gripping the bow and twisting it (torque), or the peep isn’t centered | Relax the bow hand, check the 45-degree knuckles, recenter the housing in the peep |
| Right | Pulling the release hand away from the face at the shot, or plucking | Keep pulling straight back through the shot; hold follow-through longer |
| High | Heeling the grip (pushing with the base of the palm), or anchoring too low | Let the grip sit on the bony heel of the palm, favoring the thumb side; recheck both anchor references |
| Low | Dropping the bow arm to watch the arrow, or anticipating the shot | Hold follow-through until the hit; slow the trigger squeeze |
| Scattered all over | Fatigue, too much draw weight, or an anchor that moves | End the session, or lower the draw weight a few pounds |
| Tight group, wrong spot | Form is fine, the sight is off | Move the sight toward the misses (“follow the arrow”) |
Only adjust the sight when groups are tight. Moving the sight to chase scattered arrows just hides a form problem.
A 20-minute first practice session
Most people learning how to shoot a compound bow practice too long, not too little. Short, focused sessions beat long, tired ones. These compound bow tips for beginners assume a large target and a clear range, and the whole session uses fewer than two dozen arrows. If you’re practicing at home, an outdoor archery practice target gives you a safe backstop; check that it’s rated for compound bows at your draw weight.
- Minutes 0–3, blank bale. Stand a few yards from a big target with no aiming point and shoot 3 arrows focusing only on a smooth draw, solid anchor, and surprise release. Field & Stream’s back-tension plan uses a similar close-range, eyes-closed drill to groove the release.
- Minutes 3–13, 10 yards. Shoot 3 ends of 3 arrows at one spot. Pelican suggests starting around 10 yards, and Field & Stream practices at 10 or 15. After each end, walk up and check the group pattern against the table.
- Minutes 13–18, back up only if you’ve earned it. If your last two groups each fit inside a paper plate, move back to 15 or 20 yards and shoot 1 or 2 ends. If not, stay at 10.
- Minutes 18–20, one arrow that counts. Walk away from the target, come back, and shoot a single arrow as if it were the only shot of the day. Bill Winke recommends this kind of first-arrow practice because in the field the first shot is the only one you get. Write down one thing that worked.
The stop rule: quit the moment you can’t hold anchor without shaking, or you catch yourself rushing. 60X Custom Strings’ Todd Lambright advises shooting within about seven seconds of reaching full draw. If you’re regularly holding past that, you’re tired. Arrows shot tired teach tired form.
Once your groups are consistent at 20 yards, start practicing at unknown distances. That’s where judging range in the field comes in, and a pair of [compact binoculars]({{URL: best compact binoculars roundup}}) helps you pick a spot on a target at hunting distances.
How do you let down a compound bow without shooting?
You let down a compound bow by keeping the release hooked, taking your finger off the trigger, and easing the string forward under control while the arrow stays pointed at the target. Do it any time the shot feels wrong. Letting down is a skill, not a failure, and it’s missing from every top-ranking guide on how to shoot a compound bow we reviewed.
- Keep the bow pointed at the target or a safe backstop.
- Move your trigger finger behind the trigger, or off the thumb button.
- Hold the release firmly and let the string travel forward slowly, resisting the weight as it rises back over the cams.
- Unhook only once the string is fully at rest.
Never just let go of the string or a finger-held arrow. Crossbows follow a different process; see our guide on how to safely uncock a crossbow.
Beginner compound bows to consider
If you don’t own a bow yet, the easiest way to learn how to shoot a compound bow is on an adjustable model. These let you start at a light draw weight and turn it up as you get stronger. BowsHunting.com picks are based on published listing details, not hands-on testing, so confirm the specs on each listing before buying.
| Bow | What the listing highlights | Check before you buy |
|---|---|---|
| Topbows compound bow kit (also this variant) | Adjustable draw weight, sold with equipment and accessories | The real starting draw weight, your draw length range, and which hand |
| AMEYXGS compound bow | Marketed for archery, hunting, and practice | Adjustment range and what’s included |
| Genesis Gen-X compound bow | Right-handed model from the Genesis line | That the draw weight suits your size; left-handed shooters need a different listing |
| Southland Archery Supply compound bow package | Bow sold as a package with accessories | Whether a release, sight, and peep are included |
A kit that advertises a very wide draw-weight range is worth a closer look, because the low end is where a beginner actually starts.
Other archery-style gear on Amazon
These listings aren’t compound bows, so they won’t help you practice the form in this guide. Some readers ask about them, so here they are for comparison.
| Product | What it is, per the listing | Note |
|---|---|---|
| Guide-Rail professional mechanical slingshot | Slingshot with an integrated guide rail | Not a bow; different skills and rules |
| Repeating compound competitive shooter | Repeating shooter marketed for competition | Check the listing for exactly what it fires |
| Xguis compound slingshot | Continuous-shot compound slingshot | Not a bow; check local rules before hunting with it |
| PYMUST steel dual-use archery composite | Dual-use archery product (steel/composite) | Confirm whether it’s a bow before buying for this guide |
Key takeaways
- Learning how to shoot a compound bow starts with fit: match the bow to your dominant eye and start at a draw weight you can pull while keeping the bow level.
- Build the same 9-step shot every time, from stance to follow-through.
- Anchor on at least two touch points, center the housing in the peep, and let the pin float.
- Learn a surprise release first; command-style is an option once the pin floats calmly.
- Read your groups, not single arrows, and stop when fatigue sets in.
Ready to pick your first bow? Compare adjustable, beginner-friendly models in the BowsHunting.com.
Frequently asked questions
Can you shoot a compound bow with your fingers?
Yes, you can shoot a compound bow with fingers, and some archers do. Most modern compounds have short axle-to-axle lengths that pinch the string at full draw, though, and fingers roll the string on release. A release aid gives a cleaner, more repeatable shot. Bill Winke describes switching from fingers to a release as the fastest accuracy improvement he ever made.
How far should a beginner shoot a compound bow?
A beginner should shoot a compound bow from about 10 yards, moving back to 15 or 20 yards only once three-arrow groups stay tight. ArcheryHunting.com suggests starting as close as 5 to 10 yards. Distance hides form problems, so earn each step back.
What happens if you dry fire a compound bow?
When you dry fire a compound bow, the energy meant for the arrow goes into the limbs, cams, and string instead. That can crack limbs, derail the string, or send parts flying. Have a pro shop inspect the bow before you shoot it again.
Should I shoot a right- or left-handed bow?
Choose the bow that matches your dominant eye, not just your writing hand. A right-eye-dominant archer shoots a right-handed bow, drawing with the right hand. The same eye-dominance rule applies if you’re shopping for [crossbows]({{URL: best crossbows roundup}}), since you’ll be aiming through a scope.
Do I need to sight in a new compound bow?
Yes. Even a factory-set sight needs adjusting to your anchor, peep height, and arrows. Start with one pin at 20 yards, and move the sight toward where your tight groups land.
